Manage your stores
See every store in your business, add a second one, and copy your head office details down to it in one press.
On this page
Everything you sell belongs to a store - its own products, staff, orders and reports. BANA created one for you at signup. This guide shows the list of them, and what to do the day you open a second.
Minh’s café has traded well enough for a year that he takes a second unit across the river in Thảo Điền. It is a shop in its own right - its own till, its own staff, its own branch tax code - so it becomes its own store rather than another shelf in this one.
Before you start
- You are signed in to your headquarter store - the one BANA created at signup. The store list only appears there.
- Owner access - adding a store is a business-level change, not a day-to-day one.
- For the new store: its tax code and street address. A branch usually trades on the head office code with a three-digit suffix, like
0312987656-001.
See the stores you have
Open Settings → Merchant
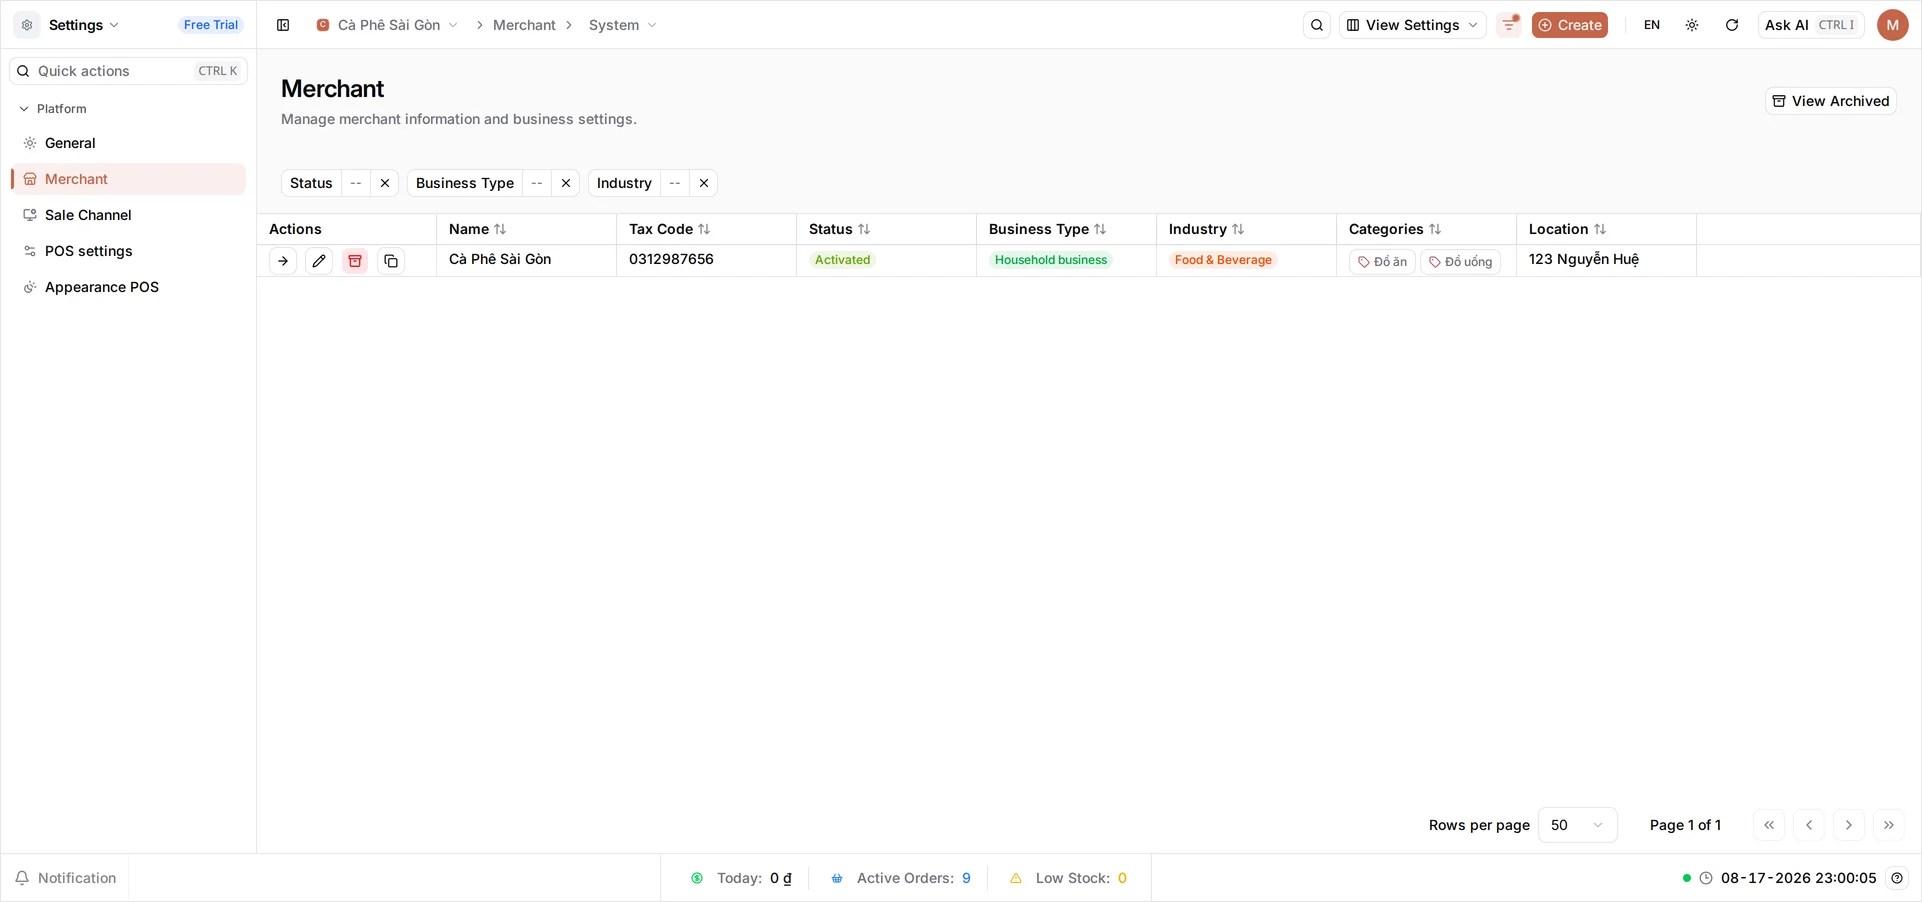
Sign in at client.bana.com.vn, then open Settings and Merchant. Each row is one store, with the details you would use to tell them apart: Name, Tax Code, Status, Business Type, Industry, Categories and Location.
Three icon actions sit at the start of every row, and they cover the day-to-day of running more than one store:
- Go to merchant - the arrow. Switches you into that store, which is how you run it: its catalog, its team, its reports.
- Edit - the pencil. Opens the same business details you edit under Settings > General, but for that store without switching into it.
- Archive - the bin. Retires a store you have closed: it goes read-only and leaves the list, and View Archived above the table brings the archived ones back into view. In that archived view the bin is replaced by a restore action on each row, which is how an archived store comes back.
One word to watch: Location here is a street address - the column shows where each store trades, and the field of that name on the form below sets it. It is not a stock location, which is a place inside one store where stock sits.
Add a second store
Start the new store
Select Create. The form is the business-details form you already know, with a Merchant Preview on the right that fills in as you type.
Enter the Name (Cà Phê Sài Gòn Thảo Điền). The field holds a Vietnamese and an English version behind the VI / EN toggle inside it, and the Vietnamese one is required. Leave the tax code and the address alone for now - the next step fills them in for you.
The Check button beside Tax Code is a lookup, not a validation gate: give it a tax code and it fetches the registered name, city, ward and address from the tax authority and fills them in for you. It is the fastest way to fill this form correctly, and it is worth pressing after you enter the branch code - if it comes back with something you did not expect, you have the wrong code.
Fill in the store’s details
The blue panel at the top of the card offers a shortcut. Apply Headquarter Setup copies down exactly five fields from head office - Tax Code, Business Type, City/Province, Wards/Commune and Location - so you are correcting a few values rather than typing all of them.
It only works if head office has all five itself. If any is missing, BANA says so rather than copying a half-filled set: a dialog headed Headquarter setup is incomplete names the fields it could not find and offers Open Headquarter Settings. You can fill them in at head office and come back, or simply dismiss it and enter this store’s details by hand - the shortcut saves typing, it is not a required step.
Warning: It overwrites those five fields with head office’s values, so use it before you fill them in - then correct what differs. For Thảo Điền that means the tax code (
0312987656-001), the street address in Location (12 Quốc Hương), and the Wards/Commune, because a branch across town sits in a different ward from head office. Work through all five rather than the two that are obviously wrong: a ward copied down from head office is the kind of error nobody notices until it prints on a document.
Either way, work down the card until every field marked with a red asterisk is filled. Industry is not one of the five the button copies, and it is required - so choose it yourself: Food & Beverage, the same as the first café. Business Type does come down from head office, already reading Household business with a warning under it: “Cannot be changed after merchant is created”. The same is true of Industry. Together they decide which categories and sale channels BANA seeds for the new store, and this form is the only place either one can ever be set.
Choose where the new store sells
Below the identity card, Sale Channels - “where this merchant sells” - lists the channels the new store will open with. A food and drink store starts with dine-in and takeaway, matching what BANA set up for your first store, and Add puts another on the list.
You can leave this alone and add channels later from Settings > Sale Channel. When you are happy, select Save in the top bar.
What you created
Your business now runs two stores under one login:
| Store | Tax Code | Location | Status |
|---|---|---|---|
| Cà Phê Sài Gòn | 0312987656 | 123 Nguyễn Huệ | Activated |
| Cà Phê Sài Gòn Thảo Điền | 0312987656-001 | 12 Quốc Hương | Activated |
Verify in the store list
Open Settings > Merchant again. Both stores are listed and Activated, sharing a Business Type and Industry but carrying their own tax code and address.
The Categories column already matches on both rows - that is the Industry you chose seeding the new store, exactly as the form warned it would. What the new store does not have yet is anything of its own: no products, no staff, no orders. Use Go to merchant to switch into it, then build it up the way you built the first. You can go straight in: the account owner is a member of every store, and a manager who opens a branch carries the role they hold at head office with them, as long as that role applies to the whole organization - see Manage employees and roles. Anyone else is invited into the new store the usual way.
Troubleshooting
- There is no Merchant item in the sidebar: you are inside a branch store. Switch back to your headquarter using the store name at the top of the page.
- Save does nothing and no error appears: a required field is empty. Check Industry first - it is required and Apply Headquarter Setup does not fill it, so it is the usual culprit. Name, Tax Code, City/Province, Wards/Commune and Location are required too; scroll the form for the one marked in red.
- Apply Headquarter Setup says “Headquarter setup is incomplete”: head office is missing one or more of the five fields it copies, and the dialog names which. Either fill them in at head office - Open Headquarter Settings in the dialog takes you straight there - or dismiss it and type this store’s details in by hand. Nothing is copied when the dialog appears, so check the fields rather than assuming they filled.
- Wards/Commune is greyed out: choose a City/Province first; the ward list is filtered by it.
- A store has vanished from the list: it was archived. Select View Archived above the table to see it, then use the restore action on its row to bring it back. Nothing was deleted while it sat there.
What’s next
Two stores means two of everything to keep straight. Get the new one trading:
Frequently asked questions
Is a second store the same as a second stock location?
No. A location is a place stock sits inside one store, and the two share a catalog, a team and one set of reports. A separate store has its own products, staff, orders and reports, and its own tax code. Open a second store when it trades as its own shop, not when you just need a back room to hold stock.
Why can I not see Merchant in the sidebar?
You are standing in a branch store rather than your headquarter. The Merchant list only appears while you are in the headquarter - the store BANA created for you at signup. Switch back to it from the store name at the top of the page.
Can I change a store's business type after I create it?
No. Business Type and Industry are chosen on this form and are locked once the store exists - they decide which categories and sale channels BANA seeds. Everything else, including name, tax code and address, you can edit later.
What happens to a store I archive?
It goes read-only and drops out of the list, along with its products and orders. Nothing is deleted - select View Archived above the table to find it, then use the restore action on its row to bring it back.